SpaceView Logo

SpaceView

Developed by RSC

Learn More!

Move Projects

SpaceView Move Projects allows users to view and edit the details of both open and closed move projects.

Navigation Buttons in Move Projects

In addition to the table navigation buttons that are found in each feature, there are several navigation buttons that are specific to Move Projects.

Move Projects

Open, Closed, and All Projects Tabs

Three tabs are provided in the top, left-hand corner of the page labeled "Open Projects", "Closed Projects", and "All Projects". These will display their label in the grid below them so users can easily filter between the kinds of projects for which they are searching.

Search for a Move Project

Date Range

This lets users filter through open and/or closed move projects based on their creation date.

Date Range

Create New Move Project

This button will let users create a new move project.

Create New Move Project

Open

This is placed next to each move project and lets the user edit details, such as adding a person, piece of equipment, or asset to the move project.

Open

Create a New Move Project

To create a new move project in SpaceView Responsive Design, users will click on the "Create New Move Project" button to the right of the projects tabs.

Search for a Move Project 2

The form to create a new move project has required and optional fields. The required fields will appear in green.

Required:

  • Customer Contact

Optional:

  • Move Project Name
  • Move Type
  • Requested Move Date
  • Priority
  • Description
Create New Move Project

Users have the option to specify the move project type. The following examples are RSC's default, but these options are completely customizable to your organizations' needs.

  • CHG - Archibus Databse Change Order
  • CONR - Construction Related
  • CONV - Convience Request
  • DEMO - Demo of Cubes, Conference Rooms, PO
  • EQP - Equipment only, Fax, Printer, etc.
  • ERGO - Ergo/Medical Related
  • EXEC - VP/High Visibility
  • FLOOR - Floorwalk
  • LAB - Lab Move
  • MAJ - Major Move
  • NEW - New Area Cube Build
  • NH - New Hire
  • PHO - Phone Only
  • RCF - Reconfiguration Only (No Headcount)
  • RUN - Run Rate
  • TRF - Transfer/Job Change
Create New Move Project 2

Clicking "Cancel" will discard the move request. Clicking "Submit" will bring the user to the Edit Move Request screen.

Edit a Move Project

This feature lets users add information to a move project, such as:

  • People, employees, staff
  • Locations, such as buildings, floors, and rooms
Edit a Move Project

To edit a move project, users will create a new move request and submit it, or they can click on the "Open" button next to any move project.

Open

Navigation Buttons in the Edit Move Request Feature

Move Edit Buttons

Upon entering a move project, a description with the basic information of the project that was entered in the "Create a Move Request" form will appear, such as:

  • Name
  • Move Code
  • Status
  • Move Type
  • Scheduled Move Date
  • Priority
  • Contact
  • Date Created

The "Home" tab will take users back to the list of the features their organization owns.

Home Tab

Several buttons will also appear that help facilities professionals and move managers execute action items for the move request:

  • Edit Move Project Information: This allows the user to reopen the initial form used to create the move request so users can edit basic information, such as:
    • Customer Contact
    • Move Project Name
    • Move Type
    • Requested Move Date
    • Priority
    • Description
  • Assign Items to Move: This will take the user to the Edit Move Request screen where they can add people, locations, assets and more to the move request.
  • View Move Summary: This creates a move report for the selected move project. This can be downloaded into an excel spreadsheet.
  • View Employee Move Project Maps: This feature is currently in development. Once released, this will let users display a floorplan of any chosen floor with move-in and move-out projects highlighted in differentiating colors.
  • Submit Move Project: This allows the move request to be submitted for approval by the move manager.
  • Cancel Move Project: This will discard the move project.
  • Default Destination Fields: If filled out before the move project is added, these will automatically populate the destination information throughout the move project.
  • Return to Move Project List: This will return the user to the list of move projects.

Assign Items to Move: Add Employees and Equipment to a Project

"Assign Items to Move" will let users add employees, equipment, assets, and miscellaneous items to a move project or request.

Edit Move Project 2

The screen is divided into two parts: "Edit project", located on the top of the screen, and "Add to project", located on the bottom. To add employees, assets, equipment, and more to a project, users will:

  1. Click on the tab under "Edit project" that corresponds to who or what you want to move.
  2. Edit Project
  3. In "Add to project", enter in the search bar the employee, asset, or piece of equipment to be added to the project.
  4. Edit Project 2
  5. Click on the "Add Employee" or "Add Equipment" button that appears next to the employees or asset name under the "Action" column.
  6. Edit Project 3

Assign Items to Move: Assign Employees and Equipment to a Location

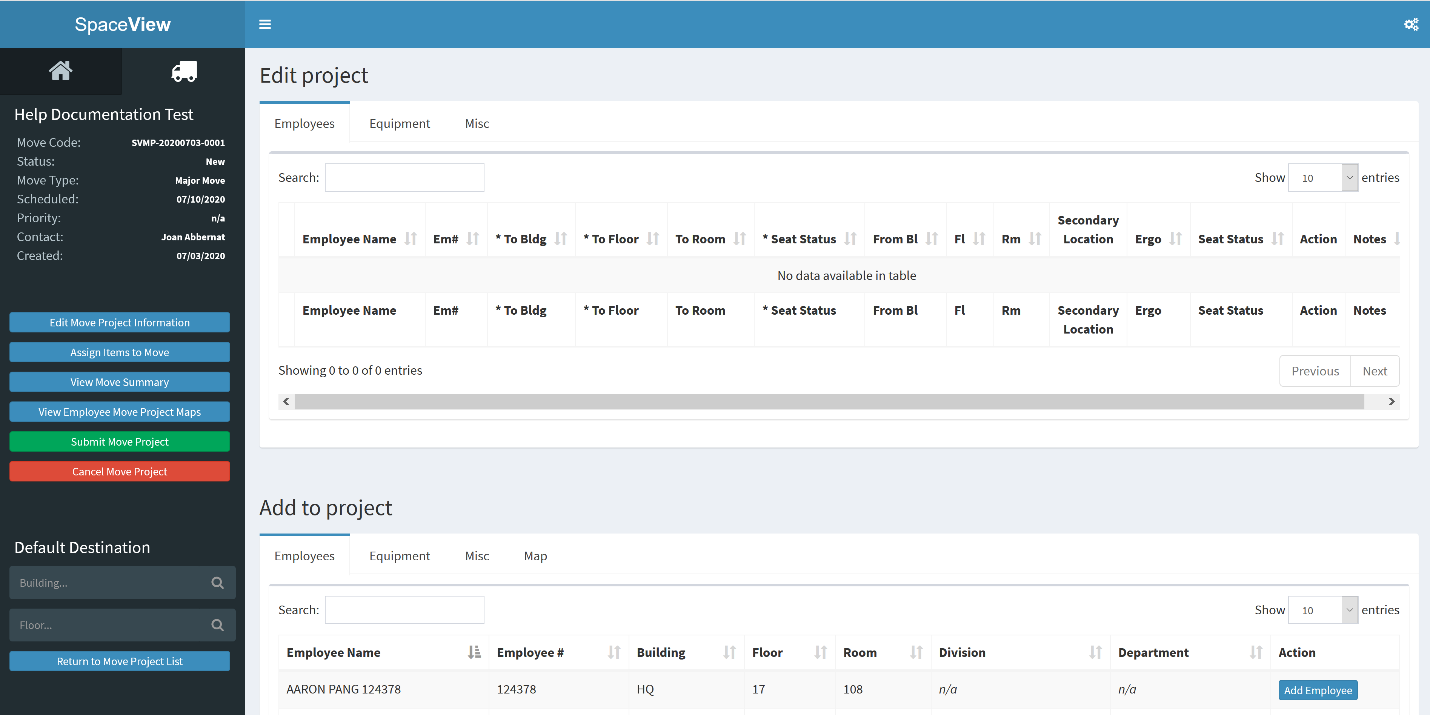
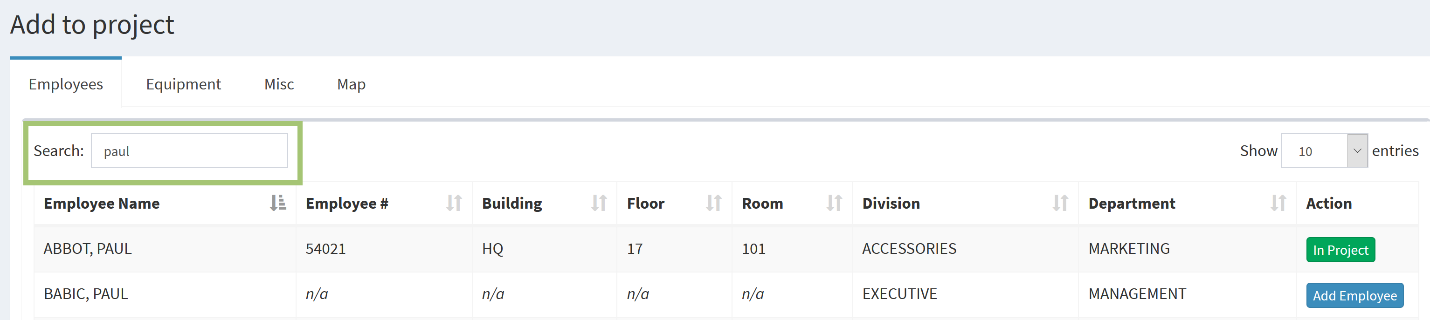
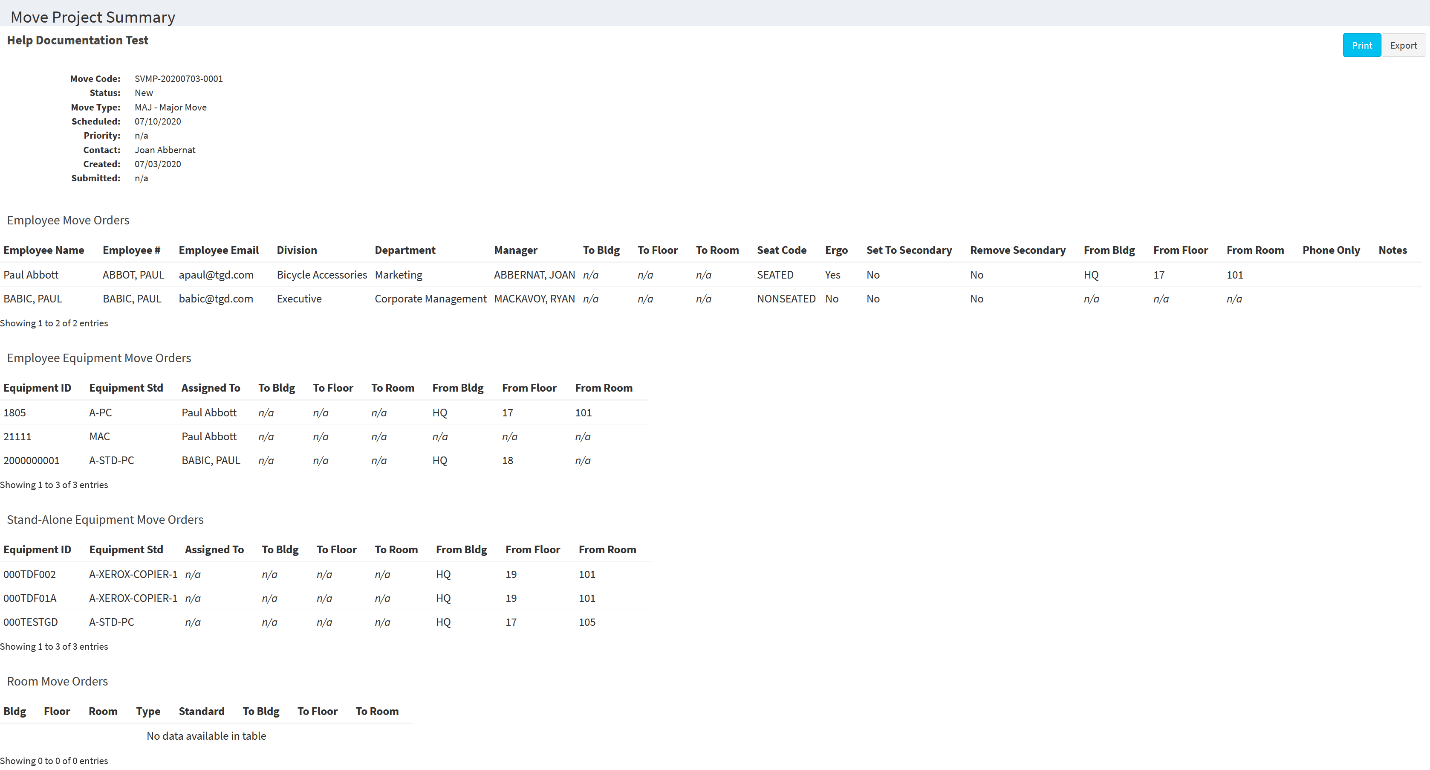
Once employees, assets, and pieces of equipment are assigned to a move project, users can assign these to a specific location within their organization's facilities. This is accomplished in the "Edit project" section in the "Assign Items to Move" screen in SpaceView Moves. The section is organized into a table that lets the user accomplish essential moves tasks.
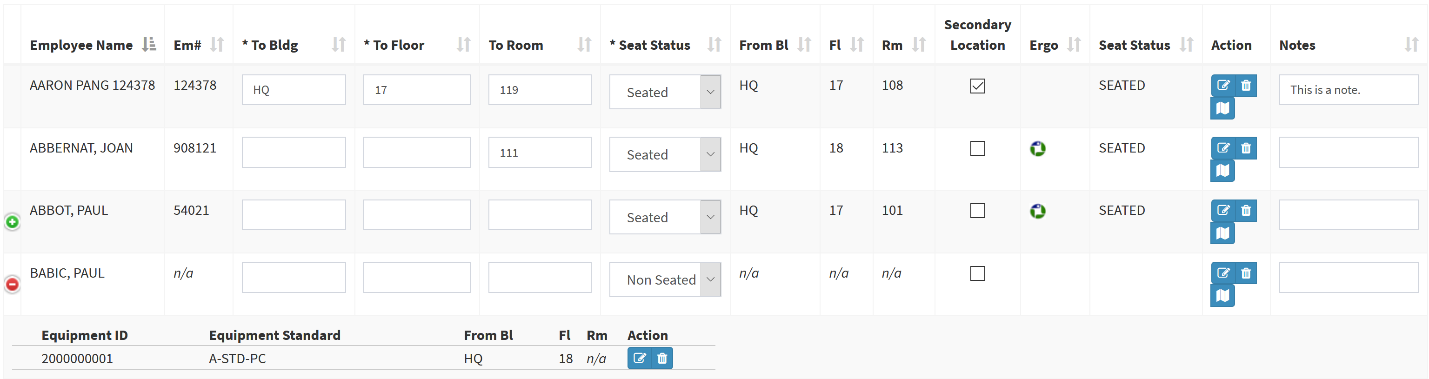
Moves Data Tables

Employee/Asset Name

This displays the name of the employee or asset that has been added to the project.


Employee ID Number

This displays the ID number of the employee or asset that has been added to the project.


To Building

This is a field that allows the facilities move manager to input the building to where the employee/asset is moving.


To Floor

This is a field that allows the facilities move manager to input the floor to where the employee/asset is moving.


To Room

This is a field that allows the move manager to input the room to where the employee/asset is moving.
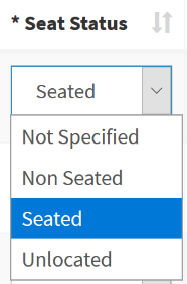

Seat Status

This is a drop-down field that allows the facilities move manager to designate the seat status of the move. It will also automatically update when the move project is completed. The statuses are configurable: your organization can change and add options that fit their process. Some options may include:

  • Not Specified
  • Non Seated
  • Seated
  • Unlocated
Seat Status

From Bl

This displays the building from where the employee/asset moved.


From Fl

This displays the building from where the employee/asset moved.


From Rm

This displays the building from where the employee/asset moved.


Secondary Location

This lets the facilities manager assign a second seating location to the employee.


Ergo

This displays any ergonomic equipment that may be assigned to the employee.


Seat Status

This displays the seat status from the drop-down field.


Action

The action field displays clickable icons that give the facilities move manager more functionality:

Edit
Employee Move Order

Trash

This will remove the employee or asset from the move project.

Maps

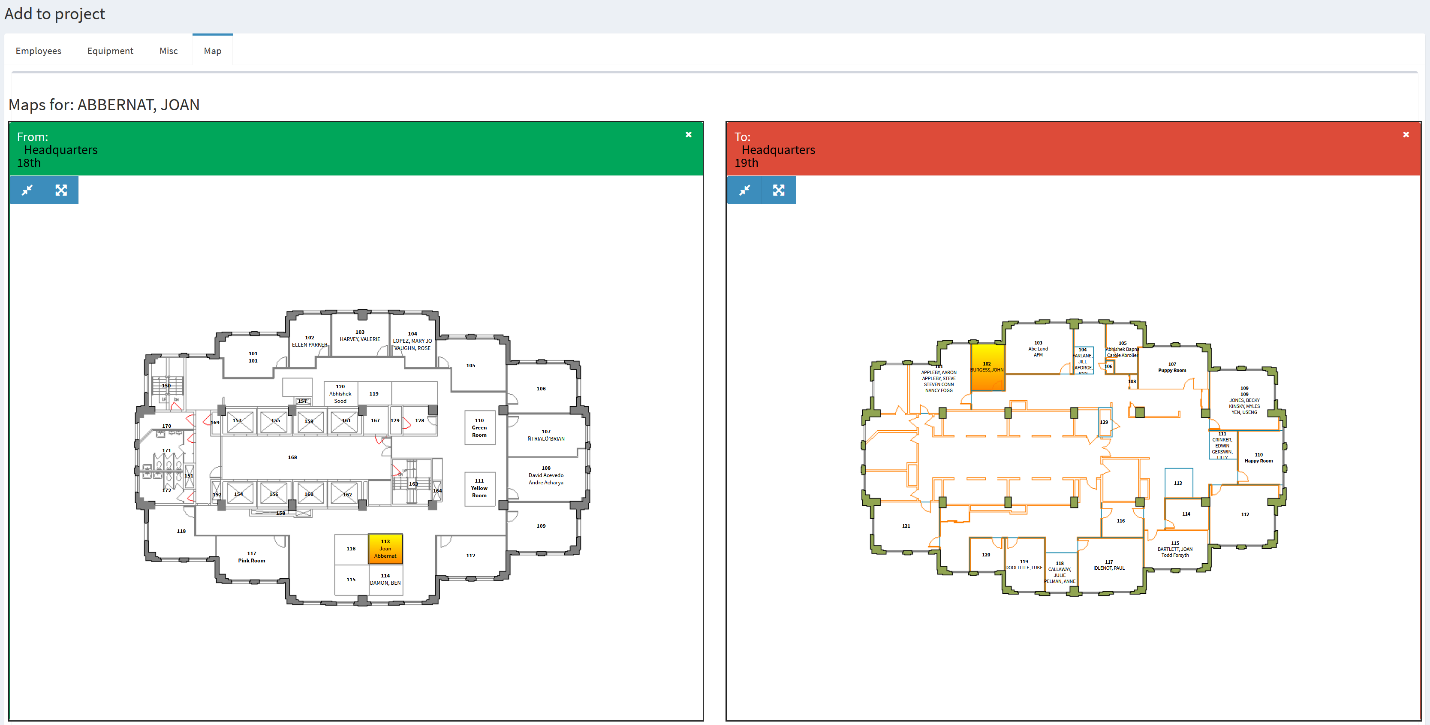
This will display the employee/asset "to" and "from" locations on floorplans. These floorplans will display in the "Add to project" section at the bottom of the screen. A "to" location must be filled out to display these.


Add to Project

Notes

This allows the user to add notes about the employee or asset.
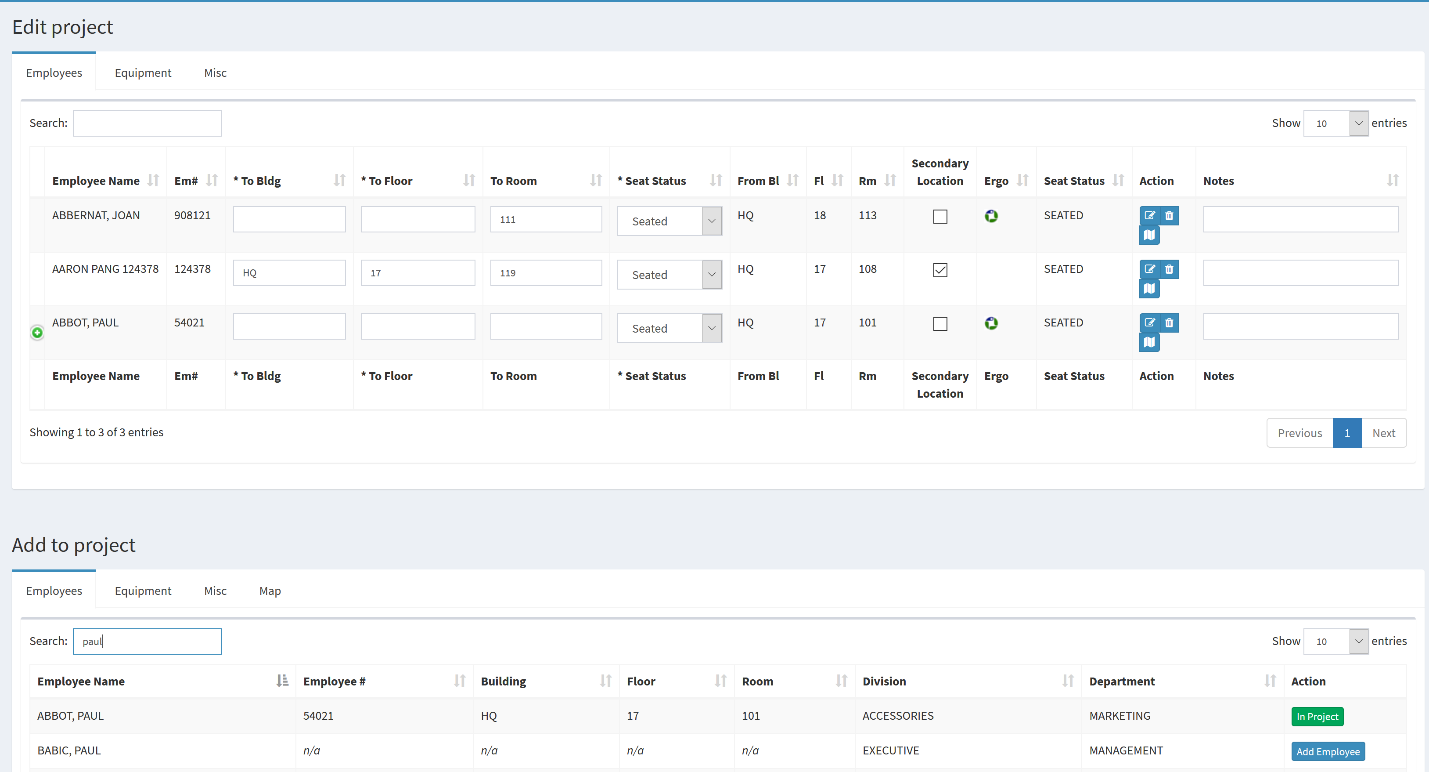

Assigned Equipment

A green plus sign will appear next to employees who have equipment assigned to them. Clicking on this will display a drop-down under their name with the equipment list. The list is also organized into its own table with fields:

Assigned Equipment
  • Equipment ID Number
  • Equipment Standard
  • From Bl (Building)
  • Fl (Floor)
  • Rm (Room)
  • Action - This has two icons that allows the user to edit equipment information and remove the equipment from the table.
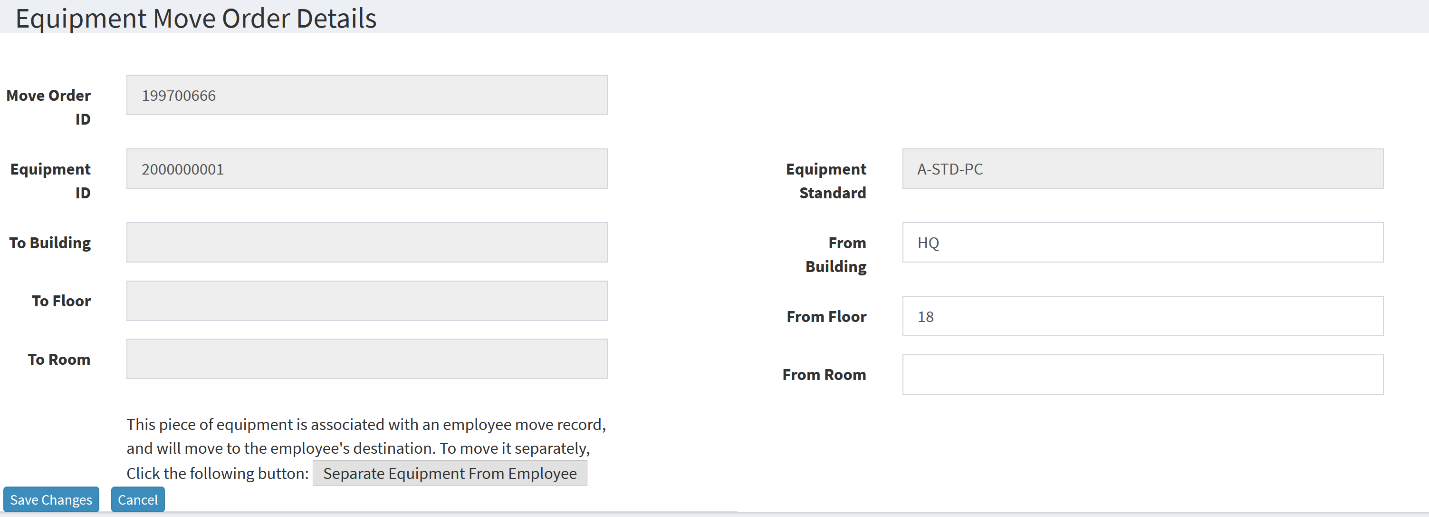
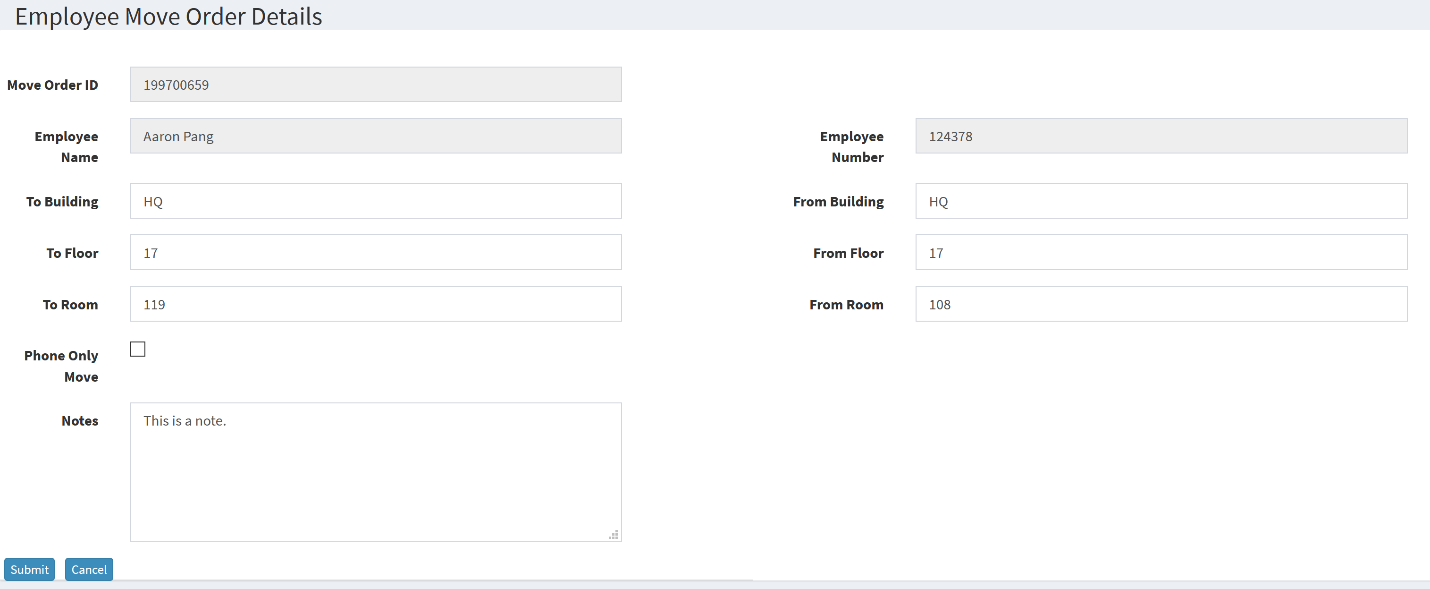
    • The edit icon will edit the basic information of the equipment. Clicking on this will bring the user to an edit form. Information that can be edited includes:
      • Move Order ID
      • Equipment ID
      • To Building
      • To Floor
      • To Room
      • Equipment Standard
      • From Building
      • From Floor
      • From Room
      • Separate the piece of equipment from the employee.
      • Save Changes made to the equipment edit form.
      • Cancel changes made to the equipment edit form
    • The trash icon will remove the piece of equipment from the table and unassign it from the employee.
    • Equipment Move Order Details

View Move Summary

This feature creates a move summary for facilities move administrators that is downloadable into an excel spreadsheet.

Move Project Summary

The summary shows all move orders of all types and the information that is available in the move request feature.


Employee Move Orders

This displays the basic information for all employee move orders:

  • Employee Name
  • Employee ID Number
  • Employee Email
  • Division
  • Department
  • Manager
  • To Building
  • To Floor
  • To Room
  • Seat Code
  • Ergo
  • Set to Secondary
  • Remove Secondary
  • From Building
  • From Floor
  • From Room
  • Notes

Employee Equipment Move Orders

This displays the basic information for all employee equipment order:

  • Equipment ID Number
  • Equipment Standard
  • Assigned To
  • To Building
  • To Floor
  • To Room
  • From Building
  • From Floor
  • From Room

Stand-Alone Equipment Move Orders

This displays the basic information for all stand-alone equipment move orders such as:

  • Equipment ID Number
  • Equipment Standard
  • Assigned To
  • To Building
  • To Floor
  • To Room
  • From Building
  • From Floor
  • From Room

Room Move Orders

This displays the basic information for all room move orders such as:

  • Building
  • Floor
  • Room
  • Type
  • Standard
  • To Building
  • To Floor
  • To Room

Miscellaneous Move Order

This displays the basic information for all miscellaneous move orders such as:

  • Asset Description
  • To Building
  • To Floor
  • To Room
  • From Building
  • From Floor
  • From Room
  • Notes

The "Print" button will print out the report, and the "Export" button will export the report as an excel spreadsheet. These are located in the top, right-hand corner of the report screen.

Print/Export

View Employee Move Project Maps

Content coming soon.


Submit Move Project

This submits the move project to the move manager for approval.


Cancel Move Project

This deletes the move project.